A realm is a place on Network54 where you can host your own images that you want to use on the discussion boards. These images can be used in your posts randomly or in your signature each time you post. I'm going to walk you through the process of how to create one! Just follow these simple steps.
Step 1: At the top of the posting area, in any of our discussion board pages you will see where it says:
Not Logged in | Login| Create Account

If you have not created an account, be sure to read our article on how to do that before proceeding. If you have created an account, you will want to click on Login. You will enter your username and password, then click Login Now. You will then be brought right back to the posting board you were at.
Step 2: Instead of it showing Not Logged in | Login| Create Account it will now show your username in the corner, followed by |My Account| Logoff. In the example below it also gives me the option to edit the forum, but you will not have this option unless you are hosting a forum of your own.

Your next step is to click on My Account.
This step will bring you to the Account Editing page on Network54. It will look like this:

Step 3: On the left of the page you will see a list of options. Underneath Resources you will see Realms. Click on that! This will bring you to the Realm page that looks like this:

Step 4: Choose a realm name and then click on NEW REALM.
Step 5: You have just created your realm and will now be brought to this page:

Your realm name will now appear in link form. It tells you where your realm is located. Copy this link and save it in computer file or folder. For certain browsers, having this link will make posting the pictures easier as you will not have the insert object option. For others, you will simply click the icon for "insert image" and be able to access your realm that way. Once you have a copy of your link saved, you will want to click on the link that reads Click Here. This will allow you to upload images into your realm.
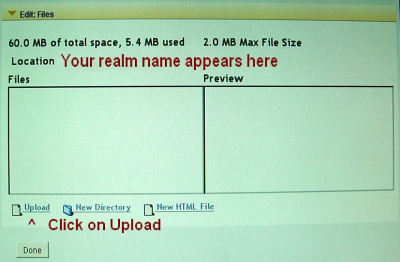
Step 6: Click on upload to pop up the browse box.

Step 7: Click on the Browse button to choose the picture or file off your computer you wish to upload. Then click the upload button that is up in that box, not the one you clicked to get that box to appear!
Step 8: Your picture will now appear in the box to the right of the upload selector.

To add more pictures, click Upload again. If you are finished click Done.
Step 9: If your browser does not support the insert object option, you can now use your realm link and add your jpg name to the end of it to create an image link. It would look something like this:
http://www.network54.com/Realm/yourrealmnamehere/yourjpgnamehere.jpg
This is all you need to post an image. Be sure that you have your posting box enabled for formatted text!

You can insert your link into your signature box so it will post each time, or add it directly into your post for a one time use. If your browser supports other options, you will simply click on the "insert object" icon, and then it will open your realm area. You will click on the name of your realm, then click on the image you want, then click insert image. It will post the picture right into the box for you! Hit preview to be sure everything is like you want it, then hit post!
To learn how to create a signature that adds your photograph and other information you want included in every post, please read "How do I create a signature?"
All images and graphics are Copyright of their respective owners. Reproduction in any form, or use without express written consent of D.A. Fox and Our Contributors is strictly forbidden and punishable in a court of law.